Most packs are sold by the liter and fitted by guesswork. You read a spec sheet, you see 50 liters and a padded hip belt, you order it, and then you spend a season with your shoulders carrying weight that was supposed to sit on your hips. Learning how to fit a hiking backpack takes about 30 minutes and one loaded walk. It is the difference between a pack you forget you are wearing and a pack you resent by mile six.
I fit packs for a living, sort of. I thru-hiked the PCT in 2021, I have carried a backpack roughly 8,000 miles in the last five years, and I work part time in outdoor retail mostly for the gear discount and the honest customer questions. The questions are always the same. Does this pack fit me. Why do my shoulders hurt. Why does the hip belt ride up onto my waist. All three have the same answer, and the answer is almost never the pack.
Why you should trust me
The trail tells you in the first mile whether a pack fits, and I have had a lot of first miles. I measure torso length before I look at a single feature, because torso length is the spec everyone ignores and the one that matters most. I test every pack the same way: a loaded 10 mile hike, a hip belt transfer check at mile eight, and a 30 day daily carry trial. I keep a grams per mile logbook, which is a nerdy way of saying I weigh everything and write down how it felt on the way back.
A fitting specialist at REI taught me to measure a torso properly, and a PCT hiker taught me to cut my base weight in half. Between those two lessons I stopped blaming packs for problems that were mine.
How I test pack fit
Three checks, in order. Skip the first one and the other two do not matter.
Torso length first. If the pack does not come in your torso range, stop reading the feature list. A pack that is two inches too long drops the hip belt below your hip bones, which means it cannot transfer load, which means your shoulders do the work all day. A pack two inches too short puts the belt above the crest and it will ride up from the parking lot.
Second, hip belt transfer. The hip belt does about 80 percent of the work. I load a pack to the weight I actually plan to carry, buckle the belt so it sits centered over the iliac crest, and then check whether the shoulder straps are doing anything more than holding the pack against my back. If I can slide a flat hand between my shoulder and the strap while walking, the transfer is working. If my shoulders ache before my hips do, the belt is not carrying its share.
Third, the mile eight check. Any pack feels fine standing in a shop. I walk a loaded 10 miles and check at mile eight for pressure points, hot spots, and whether the belt has crept up onto my waist. That last one is a pet peeve of mine, because a hip belt that rides up is a belt that has stopped working.
Packs you'll want before you start
You can run this routine on any pack you already own. Two very different packs make the lesson obvious, though. One is a load hauler that lives or dies by hip belt transfer. The other is a small pack that never had a load to transfer, and understanding why that is fine matters just as much.
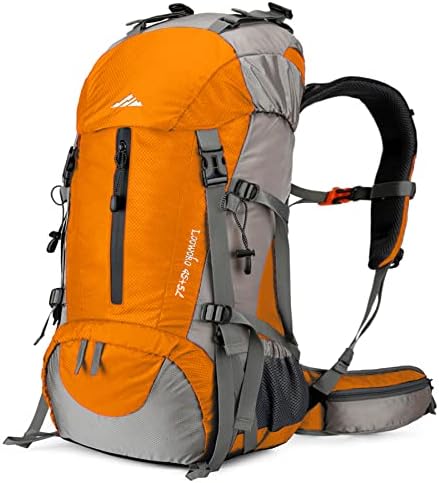
Budget pick: Loowoko 50L Hiking Backpack with Rain Cover for Both Men & Women
 Visit on Amazon →
Fifty liters is the size where the fit routine stops being optional. Once you are carrying enough for a weekend or a long day, the pack has to sit on your hips or you will feel it in your shoulders by the first climb. This is the pack I would hand someone who wants to learn the routine, because the feedback is immediate. Set the belt on the crest, load it up, walk a mile, and you will know within minutes whether you got it right.
It is a unisex pack, which means torso length matters even more than usual. Measure first. If the pack's torso range does not cover your number, keep looking, no matter how good the rest of the listing looks. The included rain cover is the other detail I care about, because I have a long standing grudge against covers that fit an empty pack and not a loaded one. Test it packed, at home, before you need it in the rain.
Flaws but not dealbreakers: A 50 liter pack is more volume than a day hiker needs. If your base weight is low you will be carrying space you do not use. It is a pack for people who carry a shelter, a sleep system, or a lot of water.
Anyone building a first overnight kit, or replacing a pack that never sat right, should start here.
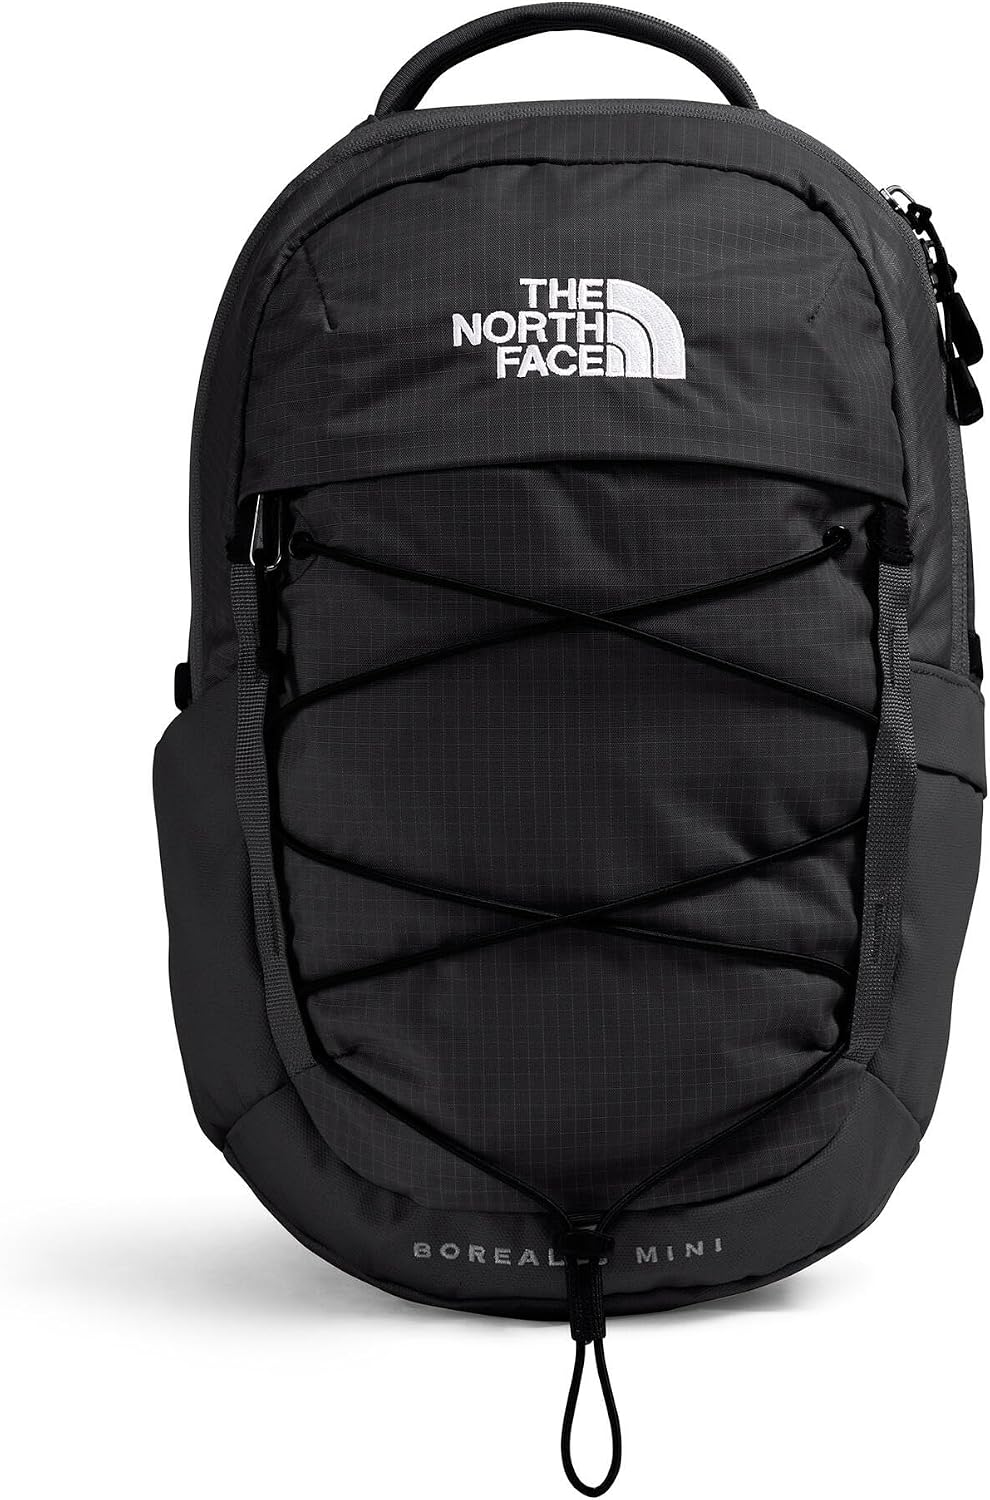
Daypack pick: The North Face Borealis Mini Backpack, TNF Black/TNF Black-NPF, One Size
 Visit on Amazon →
A small pack is a different animal, and it is worth understanding why. There is no load to transfer, so there is no hip belt transfer check to run. Everything rides on your shoulders, and at a light load that is exactly right. What you adjust instead is strap length and how the pack sits against your back. It should sit high and close, not sag down toward your lower back.
This is the kind of pack I use for the 30 day daily carry part of my testing, because what goes wrong with small packs shows up on a commute, not on a trail. A pack that sags, a pocket you cannot reach without taking the pack off, a strap that slips an inch by noon: all of it is obvious by day three. This one comes in a single size and a single colorway here, so the fit work is all in the straps.
Flaws but not dealbreakers: Do not expect hip belt transfer from a pack this size. There is not enough load to transfer and no real belt to do it with. If you want weight off your shoulders, you need a bigger pack and a proper hip belt, and that is a different purchase.
Anyone who wants a daily carry pack that stays put on a walk or a short hike will get a lot out of this one.
The actual fit workflow
Eight steps, in order. Do not skip ahead to step five.
Step one: Measure your torso. Torso length is the distance from the bony bump at the base of your neck (C7) to the top of your hip bones, the iliac crest. Have someone measure you, twice, with a flexible tape. Do not measure yourself in a mirror. That number is the only spec that decides whether a pack can fit you, and it is the spec most listings bury or skip entirely.
Step two: Match the number to the pack's torso range. Find the stated torso range and put your measurement inside it. If a listing does not state a torso range at all, treat that as a warning sign. Spec sheets that list 25 features and no torso range are a pet peeve of mine, because the feature list means nothing if the pack is the wrong length.
Step three: Set the torso adjustment before you load anything. If the pack has an adjustable harness, set it to your measurement while the pack is empty. Adjusting it later, with weight in the pack, is how you end up with a pack that never feels right.
Step four: Load the pack to real weight. A pack fitted with two jackets in it will lie to you. Load it with what you actually carry: water, food, layers, shelter. If you are fitting for an overnight trip, test with overnight weight. An empty pack tells you nothing.
Step five: Hip belt first. Put the pack on and fasten the hip belt before you touch the shoulder straps. Center the padding over the iliac crest, not above it and not below it, then snug it down firmly. This is the step everyone rushes. The belt does about 80 percent of the work, so it deserves 80 percent of your attention.
Step six: Shoulder straps last, and gently. Once the belt is set, tighten the shoulder straps just enough to bring the pack against your back. If you are pulling hard, the belt is not carrying the load and you are fixing the wrong problem. Your shoulders should feel the pack, not carry it.
Step seven: Load lifters and sternum strap. Load lifters run from the top of the shoulder straps to the top of the pack. A slight pull brings the top of the pack in toward your shoulders. The sternum strap keeps the shoulder straps from sliding outward and should cross your chest, not your throat. Neither one is a place to crank down.
Step eight: Walk a mile, then check at mile eight. Adjust nothing for the first mile, then check for pressure points, hot spots, and a hip belt that has crept upward. If the belt is sitting on your waist instead of your hips, loosen everything, reset the belt on the crest, and start again.
What goes wrong, and how to fix it
Shoulders hurt before your hips do. The belt is too loose, or the pack's torso length is wrong. Tighten the belt first. If that does not fix it, the pack is the wrong size and no strap adjustment will save it.
The hip belt rides up onto your waist. This is almost always a torso length problem, not a tightening problem. A belt that starts below the crest will climb. If your harness is adjustable, shorten the torso. If it is not, the pack is too long for you.
The pack pulls away from your back. The shoulder straps are too loose, or the load lifters are doing nothing. Snug the shoulder straps, then bring the load lifters in slightly.
The pack sits too far from your back. Usually a pack that is overstuffed, or a torso setting that is too long. Repack it, then reset the harness.
A pocket you cannot reach while walking. A pack is only as good as its worst pocket, and a useless pocket is worse than no pocket. If you have to take the pack off for water or a snack, that pocket failed. Move the item, not the habit.
The rain cover does not fit the loaded pack. Test it packed before you leave. A cover that fits an empty pack is a cover that will not fit when it matters.
The competition and why it lost
This is not a brand shootout, and it should not be, because fit beats features every time. An expensive pack that does not fit is worse than a cheap one that does. That said, brand matters when it comes to the harness, and some companies have figured out hip belts better than others.
Osprey is the best all round brand in my experience. The anti gravity suspension genuinely transfers load and the warranty is legendary. Gregory's Baltoro and Deva line has the best hip belts in the business, and if you have hips, Gregory figured it out. Deuter's Aircontact is the best option for heavy loads, because the frame is stiff and the ventilation actually works. REI's Traverse line is the best value for weekend hikers, close to the Osprey experience without the Osprey price. Hyperlite's ultralight packs are great if your base weight is under 15 pounds, and above that the frameless design punishes you.
None of those packs change the routine. Every one of them still needs your torso measurement and a loaded walk. Buy the one that fits, not the one that wins the spec sheet.
What this all costs
The routine is free. You need a flexible tape measure, a friend to read the number, and a walk with weight in the pack. That is it. No fitting fee, no appointment, no gear. If you already own a pack that has never felt right, the fix may cost you nothing, because the problem is usually belt placement or the torso setting, not the pack.
If you are buying, the two packs above are the ones I would start with, and both listings show the number that matters at the top of the page. Check current Amazon price on each one rather than trusting a figure in an article, because prices move and this one will be stale by the time you read it.
Cost per day is the honest way to think about a pack. A pack you carry 50 days a year for five years is 250 carries. Even a mid priced pack turns into a rounding error per trip, and a pack that fits turns every one of those trips into a better day. The math is easy. The 30 minutes you spend measuring your torso is the hard part.
Measure your torso. Set the belt on your hips. Walk a loaded mile. Adjust once, at mile eight, and then stop fiddling. A pack that fits is a pack you stop thinking about, and that is the whole point. The trail tells you in the first mile whether the pack fits. Go find out.